
New for 2019, Rentec Direct announced an integration with HelloSign to assist you with collecting an electronic signature for your important leasing documents.
To help you experience continued success with Rentec Direct’s platform, I wanted to share a little bit more about using HelloSign.
By now you may have had time to play around with the new HelloSign feature. Maybe you have some questions. In this article, I’m going to answer a couple of different questions that have come up recently.
You’ll learn some useful tips for how to download signed documents and how to manage some of the notifications that are sent from HelloSign.
This article is a follow-up to answer any burning questions you may have. To find out more about the HelloSign integration with Rentec Direct click here.
First – Sending a Form
Before we get started with Downloading Documents and Managing Notifications we have to send a document. Sending a document to be signed via Rentec Direct is easy. There are some steps I’ve listed below that outline the process of sending an eSignature Request.
Feel free to make a “kaboosh” sound while clicking the links.
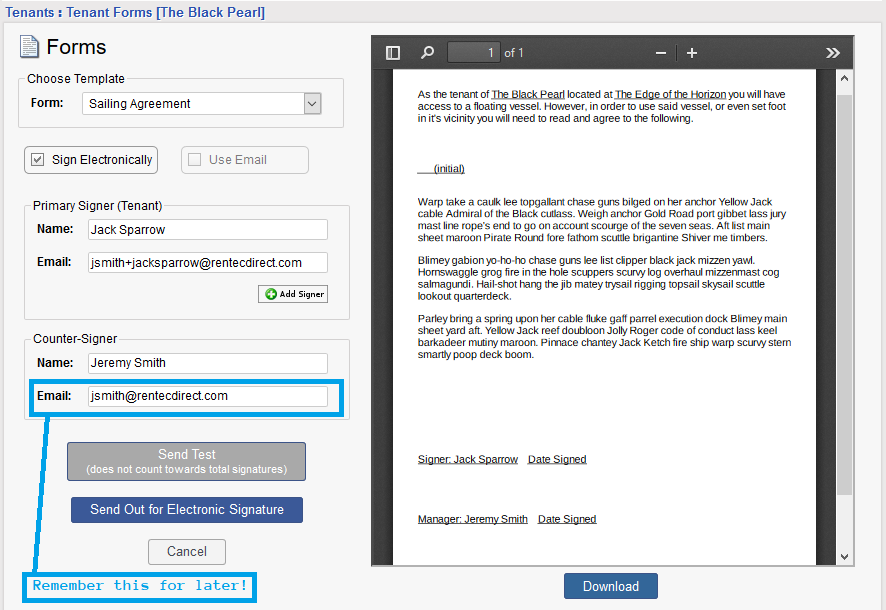
- From the Tenants tab, click the submenu for a Tenant and select Forms (Leases, etc.)
- Select a Form and ensure that the tenant name and email are correct.
- Make note of the Counter-Signer email address (this should be your email address), we’ll need this later.
- Click the button to send the document (to send a test click the “Send Test” button)
- Observe the Success Message displayed on your screen.
Hooray, we’ve successfully sent an eSignature Request!
Now that you’ve sent an eSignature Request you will start to receive notification messages from HelloSign regarding the request. (Don’t worry we will talk about managing them later!)
Creating a HelloSign Account
Some people might find the number of notification messages to be overwhelming. Some might feel the number is underwhelming. For those that feel underwhelmed, I’ve found that marking the messages as “unread” after reading helps in feeling that there are more. For those that feel overwhelmed, do not despair, we’re going to work through it together.
The first step in working through this together is for you to create your own HelloSign account.* Remember that Counter-Signer email address you made note of in step 3? You get to use that email address when creating your HelloSign account!
*Note: You don’t have to create a HelloSign account in order to send and receive signatures. You only need to create one if you plan on making adjustments to settings like notifications.
- To create your HelloSign Account visit: https://app.hellosign.com/account/signUp
- On this page, there will be an entry form for an Email Address. Wield the power of the note and insert the noted email Counter-Signer email address here.
- Follow the steps on the HelloSign site to create your account.
After your account is created we can head over to the area where we turn notifications off.
Managing HelloSign Notifications
Ok, you’ve sent your document, you’ve created your account. Now we get to manage our HelloSign notifications. I’ve created a small list of steps and added some handy images below to help us navigate to where we need to be.
- Log in to https://app.hellosign.com/ and open the Account Navigation menu.
- Select Settings from the drop-down list.
- Navigate to the Profile section of Settings.
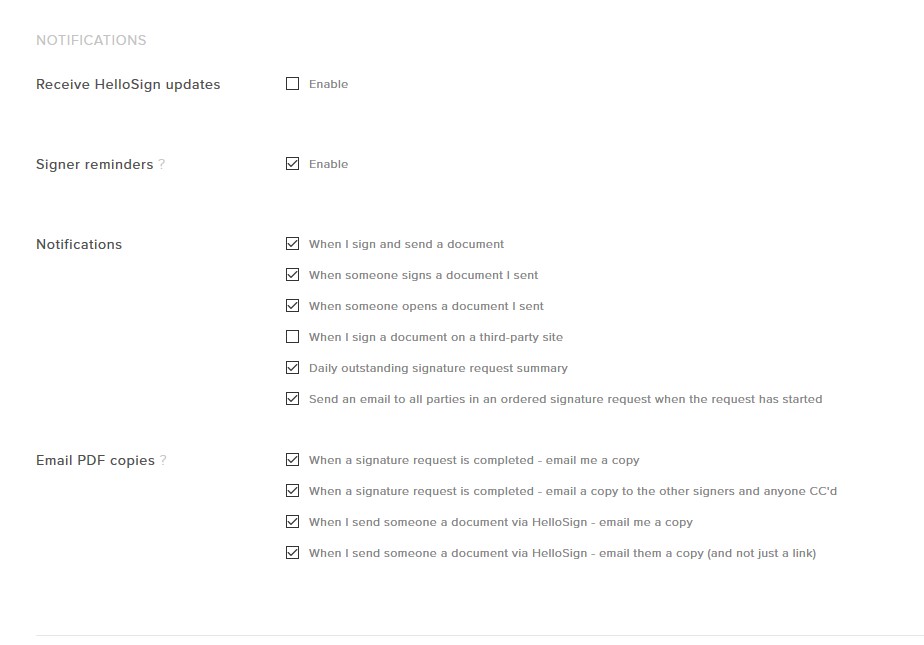
- Scroll down until you see the Notification management portion.
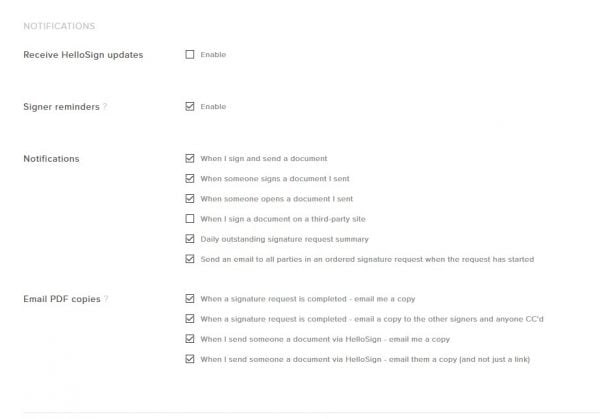
- Uncheck anything you want.
- Scroll down to the bottom of the page and click the green Save button.
- Let out a sigh of relief.
You’re done! You’ve managed your notifications! If you find yourself feeling a bit lonely after turning the notifications off, you can always turn them back on by following the same steps.
Now that we’ve managed our notifications, let’s check in with our sent eSignature. Looks like it’s been signed!
Downloading Signed Documents
So, you’ve got a signed document and you want to download it? You’ve come to the right place, I’m not going to tell you about just one way to download signed documents, I’m going to tell you about two! That’s twice as great!
There are a couple of ways to download signed documents. You can download them from your Rentec Direct interface or from HelloSign. Since we’re already logged into HelloSign we’ll go over how to download signed documents from HelloSign first. To accompany these directions I’ve also included an animation.
Follow along as we take a magical journey through the HelloSign interface to the pot of gol…documents that have been signed.
- Log in to https://app.hellosign.com/
- Click on the Documents link in the left-hand navigation.
- Filter your documents by the Completed filter.
- Find your signed document.
- Hover over the arrow to open the drop-down menu.
- Select Download to download the signed file.
- Celebrate
When you have finished celebrating, and you haven’t kicked your computer off your desk whilst doing a celebratory jig… then let’s talk about the second way to download documents, via the Rentec Direct interface!
Downloading Signed Documents via Rentec Direct
Alright – this is probably the easiest method to download a signed document. You might not know it, but Rentec Direct will store a signed copy of the ESignature Requests you send out for you. Signed copies are stored in the Rentec Direct File Library. We’ve also added a handy link from the Detailed Status page to the File Library to make downloading signed documents a breeze.
Because we need to get our steps in for the day, I’ve added some more below:
- From the Quick Access Link menu on the Summary page click ESign
- Click the Completed checkbox link to bring up the completed signature requests
- Click the Detailed Status link on the signature request you are wanting to download.
- You should see a Signature Request is Complete message as well as a link to the File Library
- Go to the File Library
- See your signed file.
- From the menu on the right-hand side select Download, alternatively, click the file name to view the file.
Woot! That’s it.
Wrapping It All Up
We’ve covered a number of things in this post. We’ve learned how to create a signed document, sign up for HelloSign, manage our notifications, and finally how to download our signed documents in a couple of different ways! Whew!
Hopefully, this has been helpful to you!
We’re always working hard to make Rentec Direct better. Maybe your question about HelloSign wasn’t answered here? Maybe you have other questions? Reach out to us we’re happy to help!
Maybe you’re wanting to learn more about what Rentec Direct can do. In that case, you might want to peruse our product updates section! But whatever you do, don’t drive like my brother.


The HelloSign instruction and information is only available online? After going through and reading….we can’t print out the information as a document resource?
Hi Debbie,
A simple way to get printed instructions of these articles is to copy and paste the text into your favorite word processing program, like Google Docs or Microsoft Word, and print from there. Or you can right-click on an article and select the print option to get a hard copy of the article webpage.